Polo Lewis


Polo Lewis, an ongoing creative world in Toronto by Julian Clarke and Ephram Markovitch.
At its centre, Polo Lewis sits as a fictional 21-year-old musician who moved to the big city of Toronto, Canada from small-town Ontario navigating boundless ambition entangled with the realities of adulthood, creeping loneliness and self-doubt. He makes music, posts it into the void, and despite the odds, he chooses to keep going.
Polo Lewis is not entirely fictional. Clarke and Markovitch are two independent musicians who know this story from the inside out. After continually crossing paths in Toronto's inner music circles, a friendship formed that became the project's real engine. Polo Lewis emerged out of their shared love of the craft and lived experience of the creative grind. What followed was years of building entirely on their own terms: a refusal to wait for permission, and a belief that doing it together was the only way it was ever going to mean something.
Polo Lewis is the embodiment of that, a multimedia project composed of music and animation founded on experimentation and misadventures as a two-person DIY operation. The character is their third self, the sum of both their parts and the thing neither could be alone. This story doesn’t just exist behind a screen but runs parallel to real life: the messy arc of creative pursuit and the spiral staircase that tricks you into thinking you’re going in circles until you see it from above. The only way through, it turns out, is making for and alongside others.
Here is a link to the Polo Lewis world:
https://linktr.ee/iampololewis
..........................................................................................................................
Some supports are required on a few parts, see notes below for details.
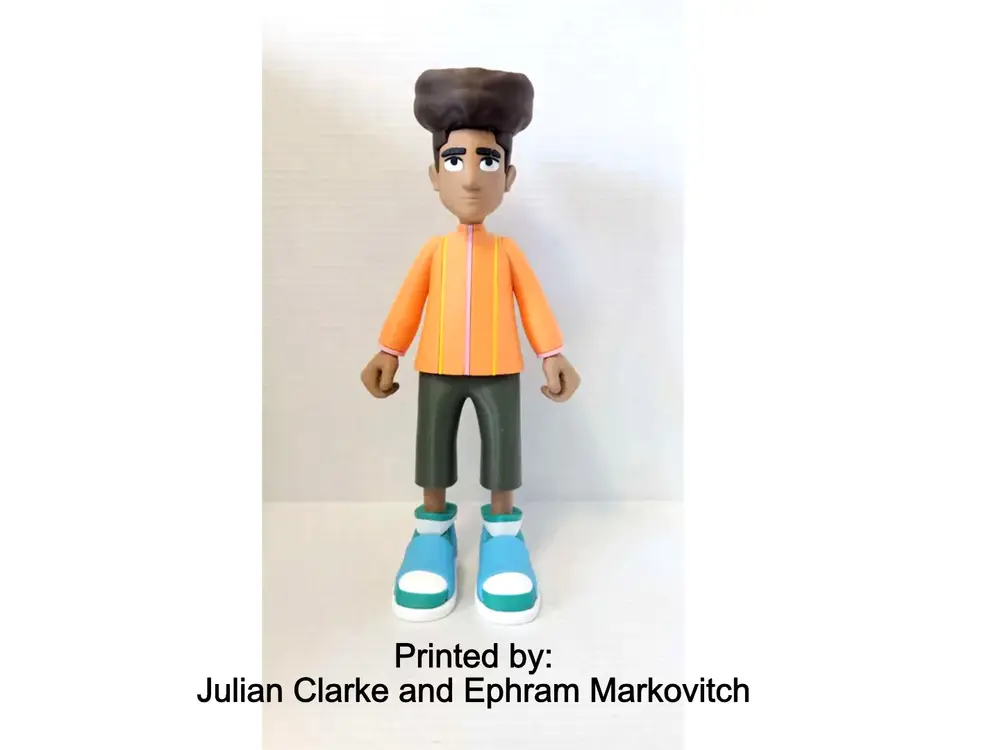
If you have the proper filament colors, no painting is needed.
The assembled model is 310mm tall as posted but has been test printed nicely at155mm (50%) as well. A life sized model was also printed by the IP owner (real clothes were used for the main body). See the pictures section for reference.
Enjoy!
...........................................................................................................
Note From time to time I make models on request for free and I simply could not resist working with these guys.
Special shoutout to Julian Clarke and Ephram Markovitch for providing great project direction, QA printing and quality feedback.
...........................................................................................................
Print Instructions:
Supports: Are required for a few parts, see specific instructions below
Rafts: no
Resolution: .2mm
Infill: 15%
Notes:**
Refer to the notes below for a few helpful printing and assembly instructions.
...........................................................................................................
Building the model
Colors
Black: (Devil Designs PLA - Black)
eye_black_right
eye_black_left
eyebrow_right
eyebrow_left_a
eyebrow_left_b
..
White: (Devil Designs PLA - White)
eye_white_right
eye_white_left
shoe_right_white_top
shoe_left_white_top
shoe_right_white_front
shoe_left_white_front
sole_right
sole_left
..
Light Green: (Devil Designs PLA - Mint)
shoe_right_green_back
shoe_left_green_back
shoe_right_green_front
shoe_left_green_front
shoe_right_green_top
shoe_left_green_top
..
Dark Green: (Devil Designs PLA - Race Green)
pants (note: my build used a grey by mistake!)
..
Skin: (Paramount3D PLA - Dark Complextion)
head
hand_right
hand_left
leg_right
leg_left
..
Brown: (Hatchbox PLA - Brown)
hair_bottom
hair_top
..
Light Blue: (3D Soulutech PLA - Aqua Blue)
shoe_right_blue_back
shoe_left_blue_back
shoe_right_blue_front
shoe_left_blue_front
..
Orange: (BambuLab PLA - Orange)
arm_right
arm_left
shirt_right
shirt_left
shirt_middle
..
Yellow: (BambuLab PLA - Yellow)
shirt_right_yellow
shirt_left_yellow
..
Lavender: (CookieCad PLA - Lavender)
zipper
cuff_right
cuff_left
..
Any color (hidden parts):
pin_hands (file contains two identical pieces)
pin_pants_shirt
..
...........................................................................................................
Printing and assembly tips
Printing tips
Note The files for this model are posted for a 12 inch tall model as requested by the IP owner. I printed a copy at 50% for verification in case makers simply want a smaller model. For stage presentation and photo shoots, a life sized version was also printed using the same files. See the pictures section for reference.
1 - Supports ARE required on a few parts.
*supports: default organic/tree supports
- hair_bottom
- head (only for the ears)
- hand_right
- hand_left
2 - There are some pieces that may need brims or rafts, use your discretion. When setting up my prints I prefer to be conservative to ensure the least chance of a print failure, especially since the base of many parts are hidden when inserted into another part. Rafts also ensure that the first layer of small parts will have a better fit for my models.
*Out of abundance of caution I used brims on:
- hand_right
- hand_left
3 - When removing parts from the printer bed, it's a VERY good idea to place left/right parts into separate containers to help with the assembly process. Sometimes the difference between the left and right parts is very small but it is still worth keeping track of them and assembling them in their proper place.
..
Assembly tips:
1 - Take your time gluing the model together and enjoy the process. Give some thought into which parts to glue together as groups and then gluing the groups together. Let the glue for each group set completely before combining groups.
2 - I used 3D Gloop (strong fast drying) and E6000 (tacky slow drying) glues to put this model together. For both glues using a smaller amount is usually better than more glue.
3 - important for all my models, be sure to dry fit all parts before gluing.
4 - Refer to the assembly diagrams in the pictures section as well as the uploaded pictures for putting the model together. The model is meant to be glued.
Do not hesitate to ask questions, feedback is essential to making better models.