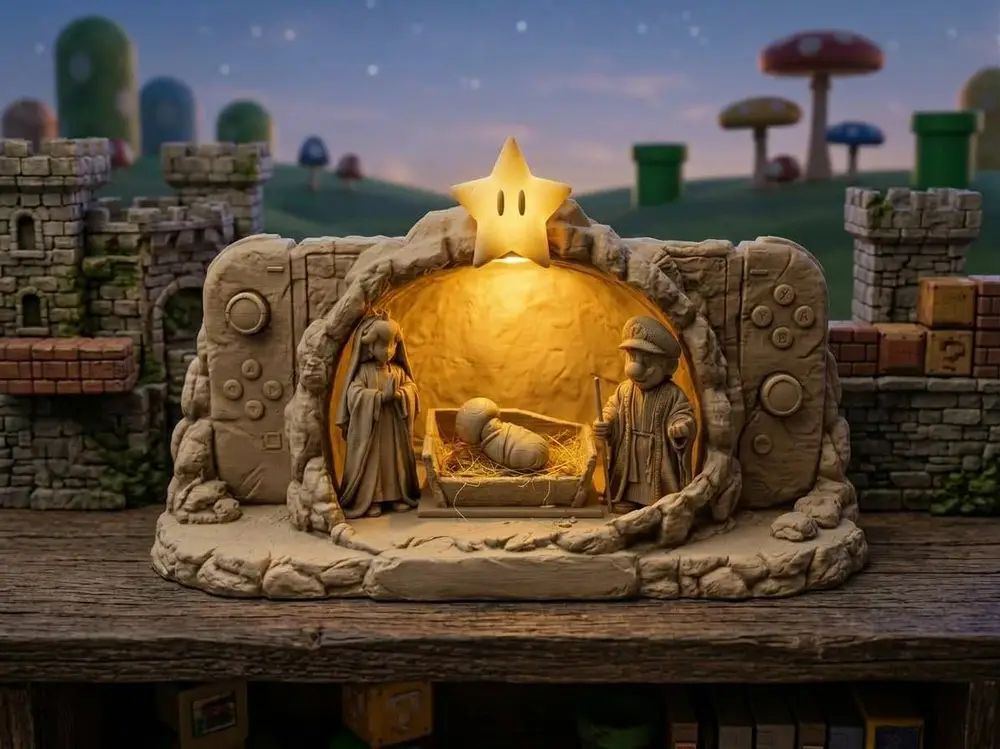
Natale Presepe Geek - Nintendo Switch Christmas


🎮 🎄 Presepe Geek: Grotta Nintendo Switch con Luce LED
Ciao a tutti! Sono davvero felice di condividere con voi questo progetto unico e originale: un Presepe ambientato all'interno di una Nintendo Switch!
Ci ho messo davvero tanto tempo, passione e impegno per pensarlo e progettarlo nei minimi dettagli, fondendo la tradizione del Natale con il mondo del gaming. Spero che vi piaccia e che possa portare un tocco di originalità e magia nelle vostre case!
🛠️ Consigli e Impostazioni di Stampa (Print Settings)
Per ottenere il miglior risultato estetico e strutturale, vi consiglio di dividere la stampa seguendo questi parametri:
1. La Grotta / Scocca Nintendo Switch
- Altezza strato (Layer Height):
0.20 mm - Riempimento (Infill):
5% - Supporti: Supporti ad albero organico (Organic / Tree Supports) dove necessario
2. I Personaggi (Natività)
- Altezza strato (Layer Height):
0.12 mm(consigliata per massimizzare la resa dei mini-dettagli) - Riempimento (Infill):
15% - Supporti: Supporti ad albero organico (Organic / Tree Supports)
⚠️ AVVERTENZE FONDAMENTALI E MONTAGGIO
- Dettagli sottili / Bastone di Giuseppe: Prestare estrema attenzione durante la rimozione dei supporti attorno ai componenti più delicati e ai bastoni dei personaggi, poiché potrebbero spezzarsi facilmente.
- 💡 TRUCCO IN CASO DI ROTTURA: Se un elemento fragile si rompe durante il post-processing, vi consiglio di utilizzare un piccolo pezzo di filamento del colore originale inserito come perno e incollarlo con della colla cianoacrilica (Attak). Risulterà invisibile!
- Illuminazione LED:
- Sul retro della struttura della Switch è presente un foro / alloggiamento dedicato per inserire un punto luce o una candela LED a batteria.
- Si consiglia di fissare il punto luce all'interno utilizzando del nastro biadesivo.
- (In foto potete vedere l'effetto finale ottenuto con il LED acceso).
🎨 Materiali e Rifinitura Estetica
- Materiale consigliato: PLA (Potete stampare i Joy-Con e la scocca in colori diversi per simulare una vera Switch, oppure realizzare un modello monocromatico elegante).
- Pittura opzionale: L'oggetto rende benissimo già con i colori del filamento, ma se volete personalizzarlo potete tranquillamente rifinire i personaggi e i dettagli utilizzando colori acrilici ad acqua.
💬 Un piccolo favore...
Se decidete di stampare il mio modello, vi chiederei con il cuore di pubblicare una foto della vostra stampa nei commenti e di lasciare un feedback o un mi piace! Vedere le vostre creazioni è la ricompensa più grande per il lavoro svolto.
Grazie a tutti per il supporto e... Buona Stampa! 🚀
🎮 🎄 Geek Nativity Scene: Nintendo Switch Grotto with LED Light
Hi everyone! I’m really excited to share this unique and original project: a Nativity scene set inside a Nintendo Switch!
I poured a lot of time, passion, and creativity into designing every last detail, blending Christmas tradition with the world of gaming. I hope you enjoy it and that it brings a touch of wonder and magic into your homes!
Printing Tips & Settings
For the best results and structural integrity, I recommend using these print settings:
1. The Grotto / Nintendo Switch Shell
Layer height: 0.20 mm
Infill: 5%
Supports: Organic tree supports (where necessary)
2. The Figures (Nativity)
Layer height: 0.12 mm (recommended for capturing fine details)
Infill: 15%
Supports: Organic tree supports
Assembly & Important Notes
Fine details / Joseph's staff: Be extremely careful when removing supports from the main components and the figures' staffs; they can snap easily.
💡 FIX FOR BREAKAGE: If a delicate part breaks during post-processing, I recommend using a small piece of filament (in the matching color) as a pin and gluing it with cyanoacrylate (super glue). It becomes invisible!
LED Lighting:
There is a dedicated hole/slot on the back of the Switch structure to insert an LED light or LED tea light. 💡 I recommend attaching the light source inside using double-sided tape.
(The photo shows the final effect with the optional LED).
🎨 Materials and Aesthetic Finish
Material: PLA (You can print the Joy-Cons and the body in different colors to mimic a real Switch, or create a sleek, monochromatic model).
Painting: The object looks great using the filament colors straight from the printer, but if you want to customize it, you can paint the characters using water-based acrylics.
One small favor...
If you decide to print my model, I would sincerely appreciate it if you shared a photo in the comments and left some feedback or a "like"! Seeing your creations is the greatest reward for the work I've put into this.
Thanks everyone for the support, and... Happy Printing! 🚀
您不得分享、转授权、出售、出租、托管、转让或分发该数字文件或该对象的3D打印版本,以及以数字或物理形式存在的任何其他衍生作品(包括混音)。未经许可,您不得以任何方式使用这些物品进行费用收取。