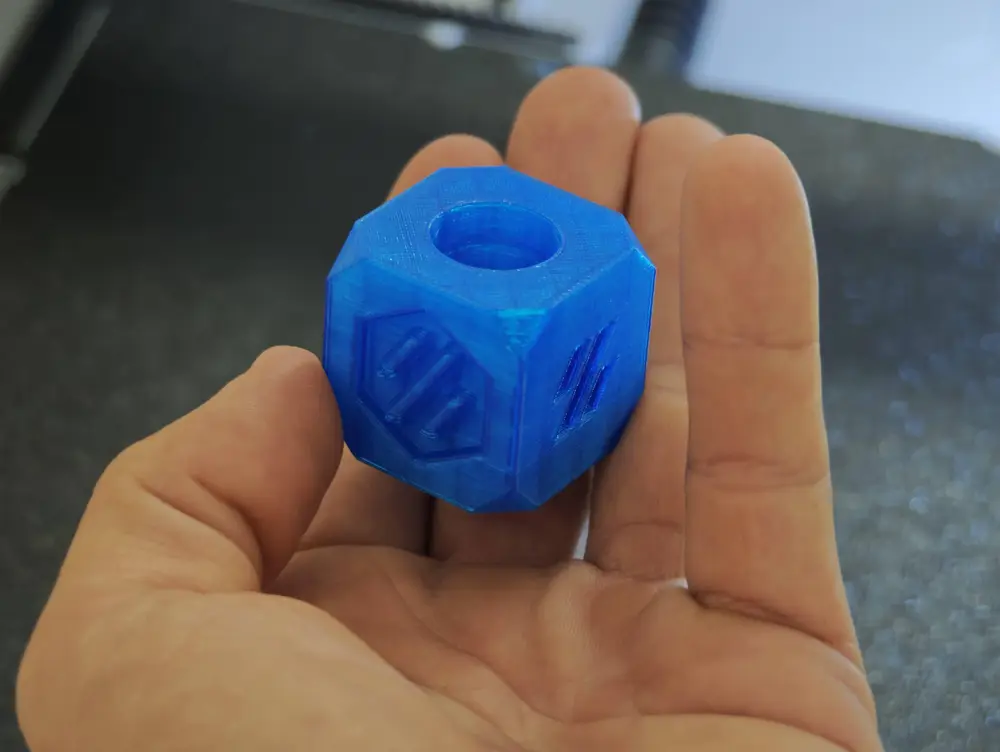
TPU 95A High-Quality Profile for Kobra X | Optimized Print Settings


TPU 95A Professional Print Profile for Kobra X
✨ Why This Profile?
Printing TPU on the Kobra X can be frustrating. Failed prints. Inconsistent results. Temperature guessing. Clogging nightmares.
This profile eliminates all of that.
This is a battle-tested, production-ready TPU 95A configuration developed through extensive real-world printing and refinement. Every parameter—speed, temperature approach, cooling strategy, extrusion control—has been optimized for maximum reliability and quality on the Kobra X.
Stop experimenting. Start printing successfully.
🎯 What You Get
✅ Pre-configured .3mf file — Load, delete the test model, add your STL, print
✅ Locked print parameters — No guessing, no wrong settings
✅ Professional drying protocol — Two-cycle method (8h + 4h pause + 8h) for guaranteed material prep
✅ Temperature calibration guide — Find YOUR filament's perfect temp in one session
✅ Multi-color ready — Print up to 4 colors of TPU 95A simultaneously
✅ Step-by-step photos — Visual guide for every critical step
💎 Real Results
- Consistent first layers — No more adhesion lottery
- Smooth surfaces — No quality compromise for speed
- Reliable 4-color printing — When you need multi-material complexity
- Zero guesswork — Every parameter pre-tested for Kobra X hardware
- Fast setup — From unbox to first print in hours, not weeks
🔍 Who Should Use This?
✅ Makers printing TPU for the first time (step-by-step guidance included)
✅ Experienced users tired of failed TPU prints
✅ Anyone printing flexible parts that demand quality
✅ Users printing multi-color TPU projects
✅ Professionals needing consistent, repeatable results
⚡ Key Advantage: Profile Speed Lock
All print speeds are locked and optimized in the profile. They won't change, can't be accidentally modified, and represent the maximum speed tested while maintaining excellent quality.
You're not getting slow prints. You're getting fast prints done right.
📚 COMPLETE STEP-BY-STEP INSTRUCTIONS
PHASE 1: FILAMENT PREPARATION (Critical)
Step 1 – Two-Cycle Drying Protocol
TPU absorbs moisture. This protocol ensures perfect drying:
Cycle 1:
- Place filament in dryer at 50°C for 8 hours
- Remove and store in airtight container for 4 hours rest
Cycle 2:
- Return to dryer at 50°C for another 8 hours
- Material is now ready—do not expose to open air
⏱️ Timeline: 20 hours total
Why this matters: Improperly dried TPU = porosity, weak layers, failed prints. This two-cycle method is non-negotiable.
PHASE 2: TEMPERATURE CALIBRATION
Step 2 – Find YOUR Filament's Perfect Temperature
Every TPU 95A is different. You MUST calibrate for your specific filament. USE THE CALIBRATION TEMPLATE ON ANYCUBIC SLICER. another way is:
- Download a Temperature Tower STL
- Open this profile's .3mf file
- Import the Temperature Tower STL
- Slice and print
- Observe which section looks best:Cleanest extrusion
- Least stringing
- Best flow consistency
- Update your profile:Bambu Studio → Material Settings → Temperature
- Modify first layer and remaining layer temps
- Save as new material preset
Reference values: 220°C (first layer) / 215°C (remaining)
Your filament may need different temps—trust your test results.
PHASE 3: PRINTER CONFIGURATION
Step 3 – Critical Printer Setting: Disable Clogging Detection
⚠️ THIS IS MANDATORY. If you skip this, printing won't start.
Location: Printer Settings → Detection
Action: Disable "Clogging Detection" (toggle off)
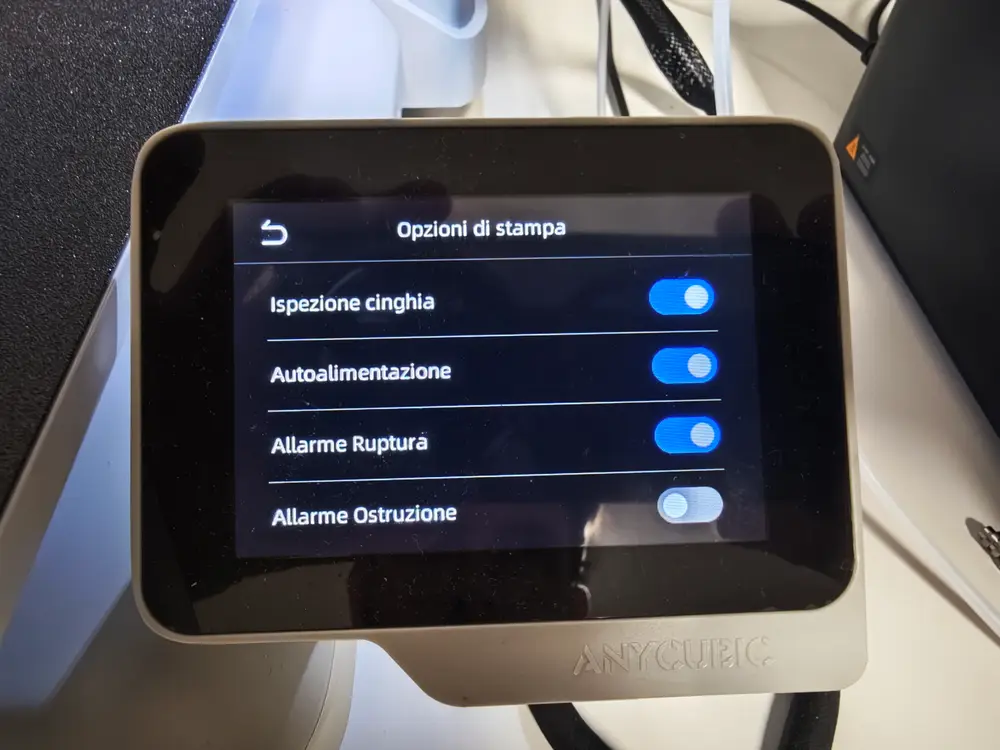
What you see in the photo:
- "Ispezione cinghia" (Belt Inspection) → ON ✅
- "Autoalimentazione" (Auto Feed) → ON ✅
- "Allarme Rottura" (Break Alarm) → ON ✅
- "Allarme Ostruzione" (Clogging Alarm) → OFF ❌ (this is the one you disable)
Why: Flexible TPU inevitably triggers the sensor during loading. Enabled = print won't start. Disabled = printer still monitors but allows operation.
Your responsibility: Monitor the print. If something seems wrong, stop.
Step 4 – Select the Correct TPU 95A Material
Location: Printer Settings → Material
Action: Select "TPU 95A"
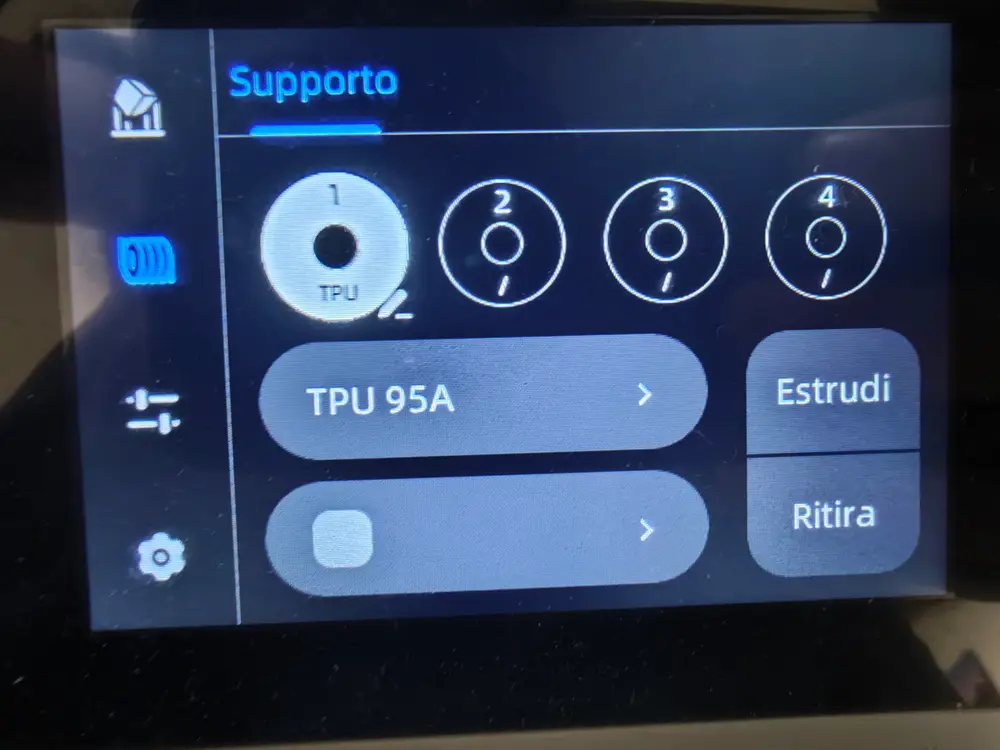
What you see in the photo:
- Slot 1 shows "TPU 95A" (your filament)
- Slots 2, 3, 4 can hold other TPU colors
- Example shows multi-color setup capability
IMPORTANT: There are TWO "TPU" options in your menu. Choose the correct one for your Kobra X TPU95A.
DO NOT: Select generic "TPU"
PHASE 4: FILAMENT LOADING (Critical Procedure)
Step 5 – External Spool Setup
- Position spool OUTSIDE the printer (never inside ACE PRO)
- Spool must unwind freely above printer
- Cannot touch anything
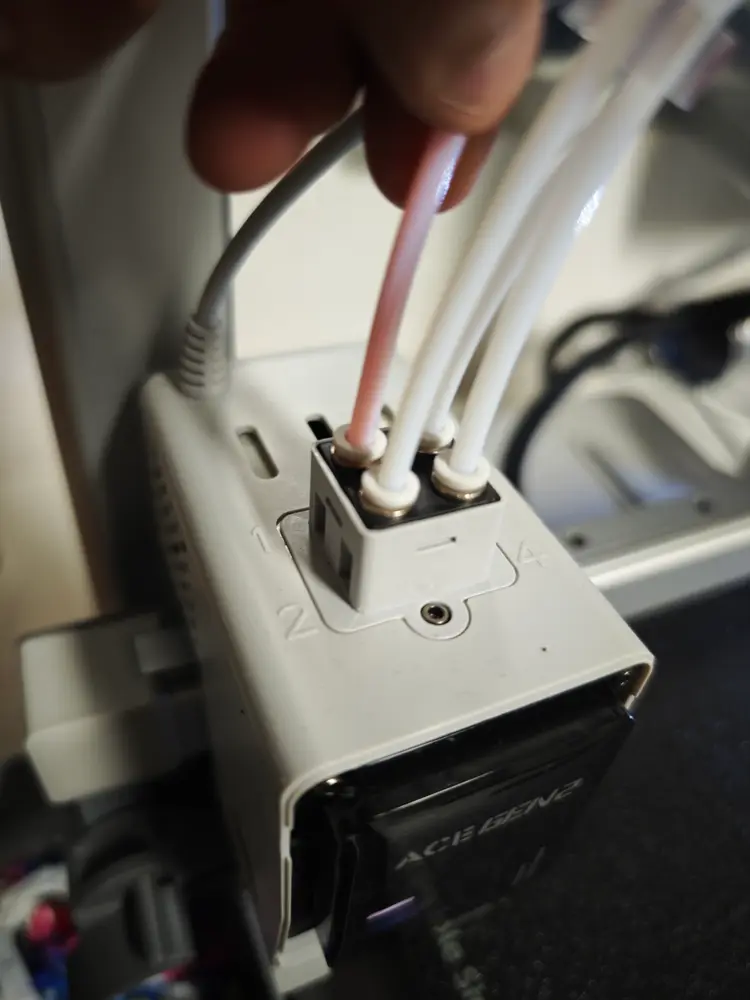
Step 6 – Filament Insertion Procedure (EXACT STEPS)
Follow these steps EXACTLY:
- Remove the PTFE tube completely from the hote
- Insert TPU filament into the PTFE tube (from top)
- Pull filament out from the front end of the PTFE tube
- Manually feed filament directly into the hotend with your fingers
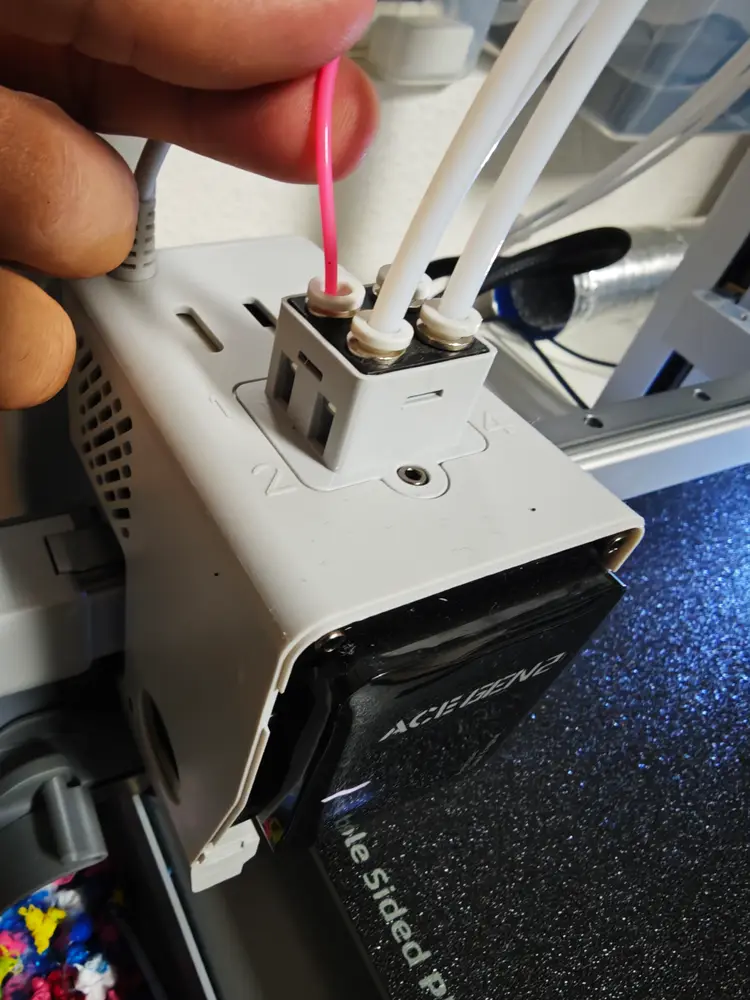
- Push until a notification on display or you hear a sound
Only AFTER hearing the sound or notification, reattach the PTFE tube to the hotend
If you don't hear or any notification on display: Remove filament and retry. This is the most critical step.
PHASE 5: MODEL SLICING & PRINT SETUP
Step 7 – Load Your Model
- Open the .3mf profile file in ANYCUBIC SLICER NEXT
- Delete the test model
- Drag your STL into the build plate
- Position as desired
- Do NOT modify any print parameters—they're already optimized
Step 8 – Support Configuration (if needed)
- Supports are compatible with this profile
- Configure support density and placement for YOUR model
- Do NOT modify support printing speeds—they're already optimized
WHAT TO EXPECT DURING PRINTING
- First layer must be perfect (smooth, well-adhered)
- If first layer fails, stop and retry
- Print will be slower than PLA—this is correct
- TPU flexes during printing—this is not a problem
🔧 TROUBLESHOOTING
Problem: Print Won't Start
Check (in order):
- Is clogging detection still enabled? (Disable it—see Step 3)
- Is TPU 95A selected? (Not generic TPU—see Step 4)
- Did you hear the click during loading? (Retry—see Step 6)
Problem: Poor First Layer Adhesion
Causes & Solutions:
- Filament not fully dried → Redo two-cycle drying
- Temperature incorrect → Calibrate with temp tower
- Build plate dirty → Clean with isopropyl alcohol
Problem: Inconsistent Extrusion
Most likely causes:
- Filament wasn't properly dried (redo two-cycle protocol)
- Hotend temperature off by 5°C (recalibrate with temp tower)
- Filament not properly seated (no click heard—retry Step 6)
Problem: Clogging Mid-Print
Immediate action:
- Stop print immediately
- Disable clogging detection if it's blocking you
- Check PTFE tube—TPU may be stuck inside
- Remove and reload filament properly (Step 6)
Problem: Poor Bridge Quality (This is normal with TPU)
TPU bridges will never be perfect like PLA—this is a material characteristic, not your printer.
Solutions (in order):
- Reduce Bridge Speed to minimum
- Increase Part Cooling Fan to 100% (on bridges only)
- Use PLA interface supports for critical surfaces
🎨 ADVANCED: MULTI-COLOR PRINTING
You can print up to 4 colors of TPU 95A simultaneously, but:
- Clogging risk increases with each color added
- Recommended: Single color for guaranteed success
- Maximum tested: 4 colors (monitor closely)
NEVER combine TPU 95A + PLA — causes dangerous hotend clogging.
💎 ADVANCED: PERFECT SURFACE QUALITY
For critical surfaces requiring flawless finish:
- Use PLA interface supports during slicing
- The PLA interface touches your model
- Easily removed after printing
- Surface quality is perfect—no support marks
📞 SUPPORT & FINAL TIPS
Still having issues?
Check (in order):
- Filament fully dried? (Redo two-cycle if unsure)
- Temperature calibrated? (Temp tower confirms correct range)
- Clogging detection disabled? (See Step 3 photo)
- Filament properly loaded? (Hear the click? See Step 6 photos)
- Spool external? (Never in ACE PRO)
📌 AFTER YOUR FIRST PRINT
✅ Save this profile permanently in Material Presets
✅ Note YOUR calibrated temperature for future prints
✅ Adjust supports for next model—everything else stays locked
✅ Share results on MakerWorld (tag @ilkekkoLab!)
您不得分享、转授权、出售、出租、托管、转让或分发该数字文件或该对象的3D打印版本,以及以数字或物理形式存在的任何其他衍生作品(包括混音)。未经许可,您不得以任何方式使用这些物品进行费用收取。