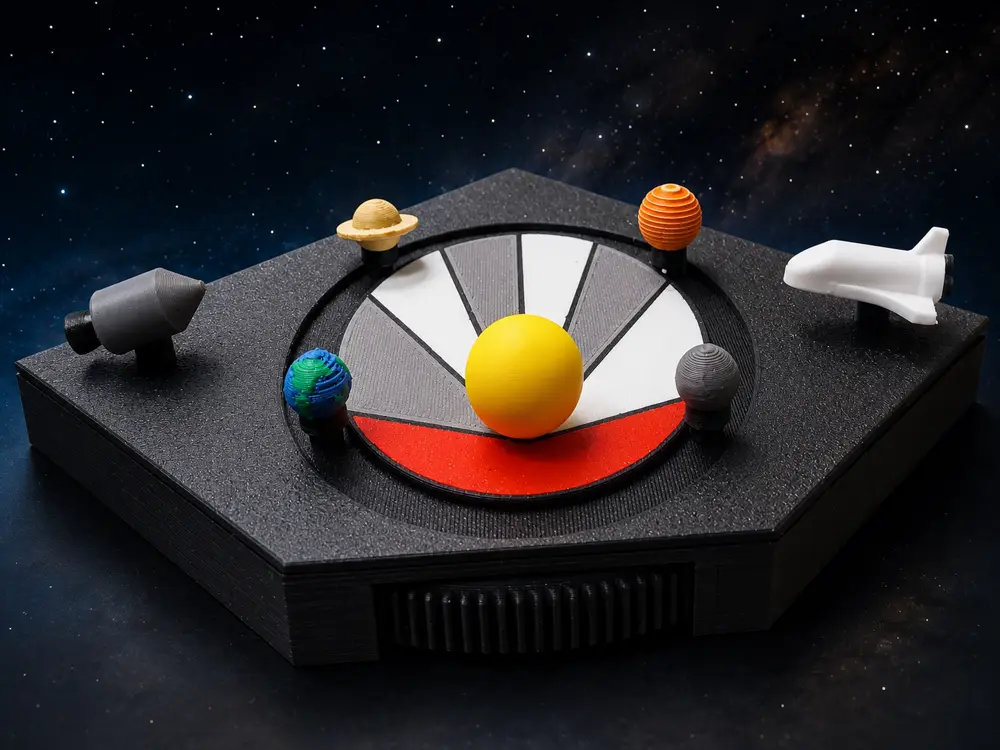
Kepler’s Second Law – Mini Orbit Diorama


Kepler’s Second Law – Mini Orbit Diorama
Turn the wheel and watch the orbiting bodies travel around an elliptical path while the coloured sections help make Kepler’s Second Law easier to understand.
Basic explanation
The orbit is divided into seven coloured segments, and each segment represents the same amount of time.
As an orbiting body approaches the Sun, it speeds up and travels farther during that time. This is shown by the large red segment near the Sun.
As it moves away from the Sun, it slows down and travels a shorter distance during the same amount of time. This is shown by the smaller segments on the far side of the orbit.
In simple terms:
Near the Sun: faster and farther.
Far from the Sun: slower and shorter.
The amount of time represented by every segment remains the same. Only the distance travelled changes.
A more detailed explanation
Kepler’s Second Law states:
A line joining a planet to the Sun sweeps out equal areas in equal amounts of time.
A planet does not move around the Sun at a constant speed.
The Sun’s gravity continually pulls the planet inward. As the planet approaches the Sun, it accelerates and moves more quickly. It therefore travels through a longer section of its orbit during a fixed amount of time.
After passing its closest point to the Sun, the planet begins moving farther away. Its speed gradually decreases, so it travels through a shorter section of the orbit during the same amount of time.
The closest point to the Sun is called perihelion, while the farthest point is called aphelion.
The seven segments in this model represent seven equal periods of time. Although their shapes and widths are different, each segment covers approximately the same swept area.
The large red segment near perihelion shows how far the orbiting body travels while moving at its fastest. The narrower alternating segments toward aphelion show the shorter distances travelled as its speed decreases.
The model therefore demonstrates:
Equal amounts of time do not mean equal distances travelled.
Instead:
- the orbiting body travels farther when moving quickly near the Sun
- it travels less distance when moving slowly farther from the Sun
- the area swept between the Sun and the orbiting body remains approximately equal for every time interval
The Sun is positioned at one focus of the ellipse rather than at its centre. This offset is what creates the dramatically different segment shapes and helps make the change in orbital speed visible.
How the model works
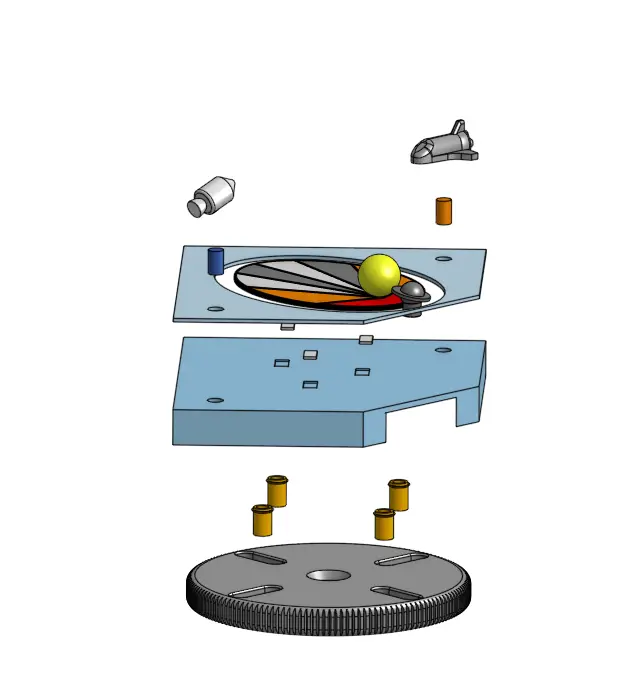
A concealed wheel underneath the diorama carries four sliding magnetic holders.
As the wheel is turned using the exposed geared edge, the holders slide within their slots while being guided around the elliptical track.
Magnets inside the lower holders attract matching magnets inside the planets above the top panel. This allows up to four objects to travel around the orbit at once without requiring visible connecting arms.
The included orbiting bodies create a colourful miniature space display, while the decorative Space Shuttle and spacecraft fill the outer area without covering the main educational diagram.
For the clearest demonstration of Kepler’s Second Law, use a single orbiting body and watch how it passes through the seven equal-time sections.
Using all four bodies creates a busier moving diorama and helps show different positions around the same orbit.
Physics concepts demonstrated
This model helps visualise:
- Kepler’s Second Law of planetary motion
- elliptical orbits
- the Sun positioned at one focus of an ellipse
- changing orbital speed
- perihelion and aphelion
- equal areas swept during equal time intervals
- the relationship between distance from the Sun and orbital velocity
- the difference between equal time and equal distance
The wheel provides an interactive representation of orbital motion, while the coloured sectors provide the main teaching reference.
The model is designed as a visual educational aid rather than a precisely timed astronomical simulator.
Assembly instructions
Required magnets
The model uses 4 × 2 mm round magnets.
Install:
- two magnets in each lower magnetic holder
- two matching magnets in each orbiting planet or object
Check the polarity before gluing the magnets into place. Each planet must attract its corresponding holder through the top panel.
It is worth testing every pair first. Otherwise, you may accidentally create the world’s smallest anti-gravity space program.
Secure the magnets with a small amount of suitable glue.
When fitting all four orbiting objects, the complete model requires:
- eight magnets for the four lower holders
- eight magnets for the four orbiting objects
- sixteen 4 × 2 mm magnets in total
Assemble the wheel
- Insert two magnets into each magnetic holder and glue them into place.
- Insert the magnetic holders into the four slots in the rotating wheel.
- Make sure each holder can slide freely along its slot.
- Position the wheel beneath the base.
- Align the magnetic holders with the elliptical guide track.
- Press the centre of the wheel firmly onto the axle.
- Rotate the wheel by hand and confirm that all four holders travel smoothly around the complete track.
Do not glue the magnetic holders into the wheel slots. They must remain free to slide as the wheel rotates.
Attach the top sections
- Align the inner top section with its three locating pins.
- Press it into position and make sure it sits flat.
- Align the outer top section with its two locating pins.
- Temporarily assemble both sections without glue.
- Rotate the wheel and check that the magnetic holders move freely underneath.
- Once the mechanism has been tested, glue the inner and outer top sections into place.
Use glue sparingly around the orbital track. Excess glue could reach the holders or wheel and prevent the mechanism from moving.
Attach the decorative spacecraft
Place the decorative Space Shuttle and spacecraft onto their mounting pins.
Adjust their orientation until you are happy with the display, then glue them into place.
Fit the orbiting objects
- Insert and glue two magnets into each planet or orbiting object.
- Check that the magnet polarity attracts the lower holder.
- Place each object over the orbital track.
- Slowly turn the wheel and confirm that the objects follow the elliptical path without catching.
The model can be used with one, two, three or four orbiting objects.
For teaching the concept, one object gives the clearest view of how its speed and distance travelled change around the orbit.
您不得分享、转授权、出售、出租、托管、转让或分发该数字文件或该对象的3D打印版本,以及以数字或物理形式存在的任何其他衍生作品(包括混音)。未经许可,您不得以任何方式使用这些物品进行费用收取。